Gentleman,
Please thank Bill Skillman from Randolf Mess for sharing his article on the making of Sharps Rounds:
Know when to Roll them, Know when to Fold them’
http://www.berdansharpshooters.com/Making_Rounds.pdfMaking Sharps Cartridges 101
by Bill Skillman
After the Sharp Shooters received their ‘Berdan contract’ NM1859 Sharps rifles, the men required cartridges that were standardized for powder charge, bullet size and weight. Standardization was essential (and still is today) to ensure that the ammunition will perform with consistency and accuracy on the target range or battlefield. An inferior cartridge will cause the men to miss their targets and lead to a loss of confidence and battlefield efficiency.
During the actions of July 2nd near the Slyder Farm, Sgt. James M. Matthews (2) reported; “Our ammunition was poor and consequently could not do as good service as we wished. Capt. McClure, John Wade, Joh Allen James Bradbury were wounded & Rounds, Mose, Boynton & Ladd are missing.” At the opposite end of the 2nd USSS skirmish line the Michigan Sharp Shooters suffered only 4 men wounded in the same fight, with none missing; and they had Col. Wm Oates entire battalion (15th and 47th Alabama) chasing them up Big Round Top! It is not known from Matthew’s account if the ammunition he complained bitterly about was the older ‘cut tail’ type cartridges.
The differences between the ‘cut-off tail’ advocates and the ‘flat base’ supporters reflects the stages of evolution of the original Sharps cartridges. Until 1860 the Sharps Company produced paper or linen cartridges which featured a strip of material or ‘tail’ at the base of each cartridge. The tail allowed the shooter to grab the cartridge and insert it into the breech easily. By drawing the loading lever up, the sharp edge of the block face sliced off the paper tail to expose the powder. This type of cartridge was used in all of the Sharps weapons until just prior to the Civil War.
However, the 1860 Ordnance trials exposed serious weaknesses in the ’clip tail’ cartridges being used in the New Model 1859 carbines. While targets at 100 and 200 yards were struck every time, accuracy dwindled considerably beyond that range. At 500 yards virtually none of the bullets hit the target. The Ordnance officers determined that the ‘clip-tail’ cartridges caused powder to be lost, thereby reducing the charge and range of the ball. Second, the same excess powder spilled into the working parts of the gun and caused a rapid fouling. While the Sharps was clearly superior over the majority of the breechloaders submitted for inspection, something had to be done to address the poor ammunition performance.
Richard Lawrence, engineer for the Sharps Rifle Mfg. Company went back to the drawing board and produced a better cartridge. He eliminated the paper case and protruding ‘tail’ and replaced it with a varnished linen casing with a new flat base; now when the breech was closed the cartridge remained intact. When the Ordnance officers fired the Sharps carbines with the new ‘flat base’ cartridges, all of the shots struck the 100 and 300-yard target and nine of ten shots struck the 500-yard target. They also noted that previous problems of fouling was significantly reduced. The Sharps carbine was selected for the U.S. Cavalry with over 80,000 being manufactured during the War. Hiram Berdan ordered 2,000 modified NM1859 rifles for his U.S. Sharp Shooters; over 6,000 military rifles were also manufactured. It was considered the best and most widely distributed breech loading weapon system of the War.
The standard military Sharps ball was .56 caliber (though the bore was designated .52 caliber) and weighed 475 grains. The .56 size was necessary, as the diameter of the grooves were as not uniform as the lands (ridges). This caused the Sharp Rifle Co. to design a bullet that would compensate for the deviations. The bullet they developed had most of the ball .53 inches in diameter, but third band was 3/1000th larger. This allowed the smaller diameter of the ball to pass easily up the barrel while the slightly larger band was forced into the rifling to impart the stabilizing spin. Unlike the hollow-based projectiles used in the rifled-muskets of the period, the Sharps ball had a solid, flat base.
The bullets made by the Sharps Rifle Mfg. Company (and their contractors) were what are called swedged balls. Unlike the tedious process of molding each ball individually or in batches, the Sharps Company used mass production to ensure the bullets met the consistency standards. First, lead was cast in molds to form long, round bars. Once cooled these round bars were sent through a rolling machine to further reduce their diameter to roughly ½ inch. Next the bars were sent through a cutter that chopped them into 1-inch long ‘slugs’. The ‘slugs’ were brought to machine presses operated by women, young girls and boys. They would feed the slug into the press (shaped like the Sharps bullet mold) and by activating a foot lever the press would close and exert tremendous pressure on the slug, transforming it into a Sharps bullet. By releasing the lever, the new bullet would pop out and be placed into a tray for inspection. The bullets would be passed along to be lubricated and then at the final stage, be inserted and secured to the linen cartridge.
Unless you own a tool and die shop, it is unlikely that you will be able to recreate the machine-pressed Sharps bullets. We either have to purchase our own molds and lead, or rely upon others to mold Sharps bullets for us. I purchased 200 rounds from Dixie Gun Works a few years back and still haven’t used them up. Winston O. Smith (1) found that he had the best results shooting bullets that were .003 larger in diameter than the bore. You can determine the exact depth of your rifle’s groove by taking a well-greased ball that is slightly larger than the bore and insert it into the chamber until it grabs the rifling. Using a wooden dowel and mallet GENTLY tap the bullet into the rifling to start it down the bore. As resistance lessens you can push the ball by hand the length of the barrel. Using a micrometer, you measure the impression left by the grooves to determine the size mold you will need. If bullet grooves are undersized gas will escape and ruin accuracy. If you have a friend who works in a tool and die shop, they could make a sizing die. The sizing die will correct any imperfections created during the molding process.
To shoot accurately, you have to use pure lead to make the bullets. I have read a few NSSA accounts by CW rifle-shooting experts who use wheel weight lead or other mixed metals. While this might work fine for gravel pit plinkin’ or taking deer at under 100 yards, I wouldn’t recommend using ‘harder’ lead. I am content to stick with using pure lead, so if my groups are wandering all over the target I know that it is not due to the bullet.
Most U. S. Sharp Shooter reenactors have never sent a real live bullet down the barrel of their Sharps rifle. I think this is unfortunate for a couple of reasons. Until you ‘live fire’ your Sharps you cannot appreciate the accuracy of these rifles that made them so popular among the USSS and any other soldier lucky enough to be issued one. On the other hand, it also reveals your own capability as a marksman. I have fired 10 shots offhand into a 3x3 foot cardboard backstop at 100 yards but my groups still exceed the 50-inch string. It is humbling for somebody who knows so much about the Sharp Shooters like I do and not be able to meet the original qualifications. So when I see reenactors become irate after taking a hasty shot at a Reb at 100 yards away and the culprit doesn’t ‘take a hit’, I am more inclined to side with the Secesh. You really don’t know what kind of Sharp Shooter you would make until you spend time on the range shooting live rounds at various distances, seasons, and wind conditions.
With your bullet supply now completed we need to think of lubricating it. Mr. Smith (and I) use lamb suet that is rendered pure. This is best done when the wife is out of the house or on the backyard propane grill, as it can be very smelly endeavor. Put the suet into a pot and add enough water to cover the bottom of the pan. As the suet begins to melt, use a spoon to skim off the scum. Pour off the grease into a mason jar surrounded by warm water until the process is complete. For lubricating the bullets, I then take 2 tablespoons of suet and add 1 tablespoon (for about 10-15 bullets) of pure beeswax into a microwave safe cup and microwave them until melted. I set the bullets upright (on their base) on an aluminum foil covered cookie sheet in rows. I then apply a coat each bullet using a hobby paintbrush dipped into the melted lubricant. When the lubricant becomes congealed you pop the cup/lube into the microwave and reheat the solution back to a melted state. A second, and simpler, approach is to simply take the bullet and dip the tip into the lubricant and then remove. But be careful, the lubricant is hot and can coat your fingers just as well as the bullet if you are not vigilant! I then pop the cookie sheet/bullets into a convection oven set at 250 degrees for about 2-4 minutes until the lube becomes soft and begins to run off the bullets. Remove the tray and let cool, the bullets should have a nice sheen to them and are slippery to touch. You can return the leftover lubricant ‘wafers’ back to the mix and reuse them.
Finally we come to the most important part of our project, construction of the paper cartridge. If you ask a USSS reenactor what sort of medium they use to manufacture their rounds from you will discover a bewildering range of paper employed: onion skin or 20 pound cotton typing paper, newspaper, examining table paper, newspaper, art paper, Post-it notes, beauty shop roller papers, adding machine tape, 3M drywall paper, toilet tissue, coffee filters, Zig-Zags, the list goes on and on.
Essentially a good Sharps cartridge should possess two qualities: one, it should be completely consumed by the explosion of the powder; and two, there should be no ‘afterglow’ particles or ash left behind in the chamber or barrel. An afterglow could spell real trouble if you inserted a fresh cartridge on top of it.
To address the first requirement (having the cartridge completely consumed), some comrades make a ‘super saturated’ solution of potassium nitrate to treat the paper before rolling cartridges. Taking a pan of hot water, you keep dumping and stirring in tablespoons of potassium nitrate into the solution until no more can be dissolved. Let the solution cool and then pour into a cookie sheet (an 12x18x 3/4 inch model). Take sheets of 20-pound cotton-typing paper and set them into the solution and wait for about 5-20 minutes. Remove the sheets and hang them from a handy clothesline or lay out on a flat surface in the sun to dry. If crystals form on the dried paper you can brush them back into the solution. For those of you who want nitrated paper but abhor the mess, Dixie Gun Works sells pre-nitrated 8 ½ x11 sheets.
This brings us to the next step of ‘rolling your own’. Again, there are as many ways to roll cartridges as there are USSS reenactors out there. But they basically break down into two basic styles: the early Sharps “cut off tail” version, and the CW era “flat base” type.
Not too surprising, the problems that we face on the reenacting field with our Sharps rifles is not unlike the predicament faced by the Ordnance officers of 1860. While the ‘clip off’ tail blanks are easy to make, the excess powder can pose a problem for rifle and operator alike. I have found two major problems with this style of cartridge:
1. When closing the breech the block cuts the ‘tail’ off the cartridge to expose the powder. During this process the block edge pushes the cartridge paper upwards as it slices off the exposed ‘tail’. The crimped paper now can act like a ‘dam’, blocking or deflecting the flame emitting from the internal cone. This prevents ignition of the powder resulting in a misfire. Usually a couple solid whacks with the palm of your hand will shake enough grains of powder loose (between the dam and the rest of the cartridge) so a second cap will explode the charge.
2. Powder from the cut off tail drops out into the block’s upper groove. Since the cone (nipple to you 20 Century boys) is situated at the right side of the block, an exploding percussion cap could ‘cook off’ any powder lying in the groove. It is essential that the shooter first blow off the granules, or turn the rifle hammer side up and shake off the excess powder, before firing.
3. While a very rare phenomenon, I have seen one Sharps carbine with a shattered wood fore stock split after grains of powder had accumulated between the barrel/receiver and the wood mortise. An errant spark ignited the accumulated powder causing an explosion. Historically, this phenomenon was discussed at length in a circular distributed by the CSA Ordnance when their copy of the Sharps carbine began experiencing the same problem. Unlike soldiers on campaign, we reenactors should be thoroughly cleaning our Sharps weapons right after each drill/tactical/scenario to minimize any potential ‘blow up’.
While we are talking about these shortcomings of the ‘clip tail’ cartridge I want to take a moment to address misfires. It is absolutely essential that you treat any misfire (failure of the cap to ignite the powder charge inside your Sharps) as a potentially dangerous situation. When I was at Jackson 4 years ago, I experienced a misfire with my Shiloh. A couple of the flat-base rounds I was using were a bit too long for the chamber and I was clipping off the cigarette paper base when raising the block. After a second cap failed to ignite the powder charge I decided to loosen up the powder by rapidly working the lever and opening and closing the block. Just as the block was closing a jet of flame suddenly ‘whooshed’ back out of the chamber. I was in a state of shock as the smell of ‘burnt dog hair’ wafted up and the sleeve of my new Sekela blouse sported a 6-inch long black-orange scorch mark. I deduced that the last cap had caused a piece of the cartridge paper to smolder. With the sudden exposure to air the paper glowed hot and the loosened powder ignited. Fortunately I was lying prone with my face and body away from the open chamber, but that was my very first—and I hope my last, accident in reenacting. Needless to say, even this old veteran learned a valuable lesson- NEVER OPEN THE CHAMBER IMMEDIATELY AFTER A MISFIRE! This is why we repeatedly stress correct firearm handling and safety in Co. B. If you experience a misfire during a tactical or scenario, we have NCO’s trained to safely clear a jammed or malfunctioning rifle. If you fire 2-3 caps and your rifle still will not fire you shout “JAM” or “MISFIRE” and the NCO will take you off the line and clear the rifle.
The original Sharps ‘Improved’ cartridges that were used by the USSS were made from linen that was varnished to impart an elementary form of waterproofing, and also helped consume the cartridge. The ‘base’ was made from the inner lining of sheep intestines, Smith refers to this as ‘gold beaters foil’. I spent 3 years perplexing numerous Sharps experts trying to find out what ‘goldbeater’s foil’ was. The original Sharps cartridges were relatively fragile, which was why the Pattern 1862 Sharps cartridge box contained a pair of wood blocks in the upper tin compartments that were drilled to hold 20 cartridges upright. I have learned that a few fellows out east have made a limited supply of linen rounds for their living history presentations, but for our purposes on the reenacting field this would be overkill.
Before I begin, I know my fellow Sharpshooter audience but since these articles get posted on the web from time to time I must state the obvious: …NO SMOKING AT ANY TIME DURING THESE PROCEDURES and ONLY USE BLACK POWDER FOR MAKING SHARPS CARTRIDGES!!!!
Materials: Elmer’s glue stick, Elmer’s liquid glue, hobby paint brush, scissors, tube forming stick (½ inch-interior-brass tube from Ace—add 1-2 turns of packaging tape to obtain the proper chamber diameter for your personal Sharps), base forming stick/base (1/2 inch solid rod-either metal or wood), cartridge paper, brass powder flask with 60 grain or adjustable spout, 1x1 inch single ply tissue, cigarette rolling papers (1x1 or 1x1 ¼ inch).
Forming the tube.
• Take the paper and roll around the former 1 ½-1-¾ times. Cut the paper to leave 1 inch extra paper and swipe the leading edge with Elmer’s glue stick. Finish rolling the paper forward to form tube and slide off the former. Since my 30mm tape is on a roller stand this process is fairly fast and easy.
If you are just learning how to do this, be sure to make a few ‘experimental tubes’ of varying diameter to see which ones best fit the chamber of your rifle. They must not be too small (or they can be propelled up the barrel and jam); or too large that they cannot fit into the chamber. I purchased a spare gas sleeve some years ago to act as my cartridge ‘gauge’ for both live and blank rounds.
Forming the Base.
• Remove the cigarette papers from package, cut along the fold, fold the two halve in half and cut again. This will give you four 1x1 inch bases.
• Center a 1x1 inch cigarette paper over former stick (the base stick/former must be small enough to allow the prepared cartridge tube to slide over it and the cigarette paper. I use a ½ inch aluminum former that came with a Dixie Sharps rolling kit; I fit the former into a wood platform so it stands upright -this keeps my hands free to perform other operations. Crimp the edges of the cigarette paper down around the former.
• Take a prepared tube and use a paintbrush with diluted Elmer’s liquid glue and apply the paste around the last ¼ inch of the tube. Then slide the tube over the crimped cigarette paper/former until it is flush with the end of the tube.
• Another approach is to insert the tube and when it is half way down the former, brush the diluted Elmer’s around the interior of the tube. Then push the tub home.
• Slide the tube the rest of the way until the base fits flush with the end of the tube. Before removing from the former, use your thumb and forefinger to gently press the circumference of the tube to ensure that the glue and cigarette paper adhere (otherwise powder will leak out from between the gaps later).
• If you find that the tube does not release from the former there is a build up of glue on the former. Use damp 3M pad and run it around and over the former and then dry. This tends to happen more when you are doing a ‘run’ of cartridges and the glue stick glue is still soft enough to adhere to the former (after being re-wetted by the paintbrush).
• Remove the tube from the dowel and set aside to dry.
Loading & Finishing the Blank Cartridge:
• Stand the case upright on its base and carefully pour 60 grains of FFG or FFFG black powder (I use a Zouave powder flask) into the tube.
• Take a piece of tissue (1x1 is fine) and insert it over the powder using a ½ inch wooden dowel. Gently seat it onto the powder, tamping the powder down in the process. This makes for a solid, compact cartridge. ONLY USE A WOOD DOWEL—metal can create static electricity and ruin your day.
• Gently crimp the sides of the case inwards to meet in the center of the cartridge. I start with the side closest to me, fold to center; then fold in the opposite side. When the four sides are folded over, I take the wooden former and firmly press them into place. This leaves a ‘crimp’ just like you see on the top f shotgun shells. This step takes a bit of practice and I recommend you first practice this procedure on rounds filled with corn meal instead of valuable black powder. Note that I glue the edges down at this stage-it tends to make the paper too difficult to work, sticks to the tissue, gets into the powder—it’s a big mess. I’ve already been there so you don’t have to.
Finishing Live Rounds (and Fillers)
For those making live cartridges, this stage of your job is much easier. Taking the lubricated bullet and GENTLY insert it into the top of the round. GENTLY twist and slide the ball downward until it comes into contact with the powder charge. This is where you find out if the paper you used to make the casing is too thin, it will inevitably tear during this procedure.
You can use reduced loads of powder. The Wisconsin NSSA Sharpshooters (Co. G 1st USSS) use reduced charges between 45-50 grains. Since they are shooting targets ranging from 50-100 yard the reduced powder charge provides the advantages of decreased fouling and recoil. A filler of corn meal is used to compensate for the excess space/reduced powder charge. Also, for more accurate shooting, Terry Phifer (Co. B. 2nd USSS) recommends a disk punched out of a waxed cardboard (from juice boxes) or .50 caliber Wonder wad felt inserted between the base of the bullet and powder charge.
Please note that this practice (fillers) might not be allowed by some reenactment organizations. John Carey informed me that the USV has restrictions of NO FILLER of any kind added to the blank Sharps rounds. The rationale is that the corn meal might become damp enough to form into a projectile. Also, large ‘tamp-ins’ of tissue or paper towel can be propelled from the barrel and smolder on the field, not a good situation if your are fighting in bone-dry grass or timber. I came close to burning up a portion of the newly dedicated Malvern Hill battlefield after two of my ‘Michigan” rounds spewed out glowing tissue paper that landed in the tinder dry wheat field back in 1996. So a word to the wise--before you start to manufacture any blanks be sure you first check with your Company Ordnance NCO. If you are going to an out-of-state event, make sure that your officers clarify this point before you leave home!
Notes about ‘rolling’ paper:
During the first 5 years I made cartridges using a roll of 2 ½ inch wide 3M drywall tape paper. I made up a small stand and inserted the roll on the protruding spigot. That allowed me to roll, cut and glue each cartridge without having the spool running all over the counter in the process. Because the paper is off a roll, it is already inclined to resume it’s former shape (cylinder)-making it easier to work than ‘flat’ paper trapezoids. 3M paper is a lightweight, strong, brown colored paper that you find in the drywall section of hardware stores. The paper’s length is a bit too long for flat base cartridges, I usually added filler to take the place of the bullet. I used corn meal; toilet tissue or another filler that immediately disperses once it leaves the muzzle (again, review cautions about filler/reenacting organizations/safety concerns). However, I have evolved and now make rounds that have virtually no filler in them whatsoever. They are significantly smaller in height (match the same height as the original flat based round sans bullet.
I now buy the 30mm adding machine tapes in bulk from Staples. You will find these rounds are shorter than the chamber is long. However, if you make them the correct diameter there should be no problem with them sliding loose. The few times I had a thinner-than-normal cartridge, that would slide down the chamber until it engaged the rifling. If I couldn’t get it to fire, I’d slide in a second round; the resulting ‘BOOOM’ is guaranteed to turn heads on the skirmish line! The proper diameter will cause the cartridges to be slide easily into the chamber but be snug enough so that if you raise your rifle vertically the cartridge will remain in place. If you tap the butt of the rifle smartly with your hand, the cartridge will pop out. Unlike the infantry coming in off picket and having to discharge their pieces, a smart Sharpshooter will conserve his ammunition.
Is the manufacture of flat-base process long and tedious? Yes it is. However, I can usually knock out 60 rounds before an event to add to my Ordnance stores. On winter evenings I will concentrate on performing one part of the cartridge construction. I may roll out 2-300 tubes one night. Glue in the cigarette paper bases another. Then finish pouring powder and crimping the blank cartridges closed later. I an typically crank out 60 blank rounds in 1 ½ hours from start to finish. Considering the sun sets at 4 p.m. and the Weather Channel is cheerfully predicting blizzard conditions it is not an unpleasant way to pass an evening in the Great White North.
By comparison I have seen fellow Sharp Shooters arrive in camp, sit down on a campstool with a can of powder between their feet and crank out100 ‘twist tail’ cartridges for an afternoon battle. The twist tail cartridge is infinitely easier to manufacture. In this regard, you l need thin pape for this style of cartridge, thick or stiff paper tears and be too hard to twist. Also, a longer piece of paper is required due to the twist ‘tails’.
• Place paper around former stick, roll 1 ½-2 times to form a tube.
• Glue the edge (½ to 1 inch) and finish rolling (the NY USSS use Post-It notes, which has the advantage of pre-glued edges).
• Keeping the case on the former, push the paper forward ½ inch and twist it closed. Now flatten to twisted tip by pushing it down onto flat surface (or gluing closed). Remove tube from former stick/tube.
• Pour 60 grains of powder into tube.
• Pinch the tube closed-just behind the powder charge.
• Flatten and bend paper strip at a right angle from cartridge.
• Flatten paper, run a glue stick over both leading edges of ‘tail’.
• Fold leading edges inwards. Bend tail on right angle to cartridge.
• Youre ‘clip tail’ cartridges should look very similar to muzzle-loading cartridges, except the diameter is thinner.
If you use coffee filters as papers all you have to do is cut into 3 inch squares. Roll out and glue to make the casing. Twist one end closed. Pour 60 grains of powder into the tube, pinch closed and twist off the other end. This way you can use either end of the cartridge and it wll fire; simply the fastest way yet I’ve seen to make a cartridge.
Conclusion (for now)
The evolution of the Sharps rifle and its ammunition continued well beyond the Civil War. By 1874 the Sharps Rifle Mfg. Company had altered the percussion system to accept brass center fire cartridges. The sturdy and dependable toggle block action tolerated an increasingly diverse and powerful array of cartridges that were used by buffalo hunters, Creedmoor marksmen, Indians and frontiersmen alike.
I have attempted to provide the reader with suggestions on how to recreate both blank and live ammunition for our modern Sharps reproductions. The two cartridges reflect the evolution of the Sharps cartridge. Both of them work effectively, but I have found that the ‘flat base’ rounds perform much better in my rifles—both Italian and American. I would highly recommend that the reader experiment with both types of rounds to determine which one performs with the greatest reliability with their rifle and then stick with that round. The flat-based round is the most authentic for our USSS impression, and I have found that the increased attention to detail in manufacturing the flat based round is well worth the effort when you can take to the skirmish line and know that your rifle will perform as it is intended.
I welcome your thoughts and comments.
Bill
Sources:
Coates, E.J., McAulay, J. D. Civil War Sharps Carbines and Rifles. Thomas publications, Gettysburg, PA 1996
Davis, Dan. Co. G. 1st USSS email correspondence 2001.
Richardson Round Table: Soldiers in Green. The Civil War diaries of James Mero Matthews, 2nd U.S. Sharpshooters. Sandy Pointe, ME 2003
Smith, Winston O. The Sharps Rifle. Morrow & Co., New York, NY 1943
See attached photos of original Sharps ammunition, pasteboard ammunition boxes and how well the flat based cartridges shoot.
WES
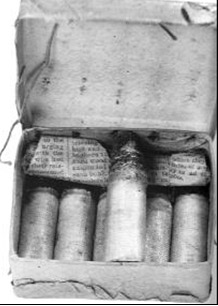
Original Sharps ammunition package opened for inspection. Note the percussion caps rolled in old newspaper. The package is opened by pulling the attached string to tear the paper wrapper. Each package contained 10 cartridges and 12 percussion caps.
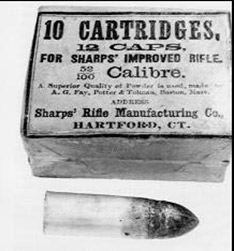
An original Sharps ammunition package as was issued to the Sharpshooters. Note the ‘flat based’ cartridge featuring the varnished linen tube, gold-beaters skin base and .52 caliber ball.
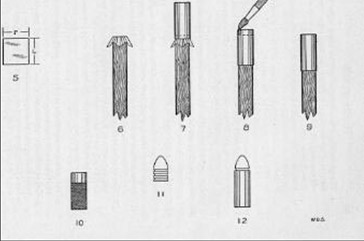
A page from The Sharps Rifle by Winston O. Smith. This shows how he manufactured his own ‘flat tailed’ cartridge. The base can be cigarette paper or other light-strong material. The second picture shows how the paper is formed over the rod prior to inserting the tube. Picture #3 shows the tube being started over the base. Picture #4 shows liquid glue (I use diluted but TACKY Elmers) being applied by paint brush around the inner diameter of the cartridge. My preference is to ‘paint’ the glue around the inner tube BEFORE fitting it over the former and pushing it into place. I then gently squeeze around the tube to ensure that all of the base adheres to the tube. Otherwise powder can leak out of any openings.
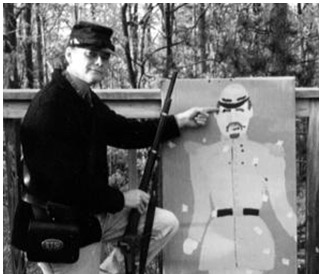
The proof is in the shooting. ‘Jeff Davis’ sports 4 shots to the head, 5 in the chest and 1 in the upper arm. 100 yards off-hand using a Shiloh Sharps and ‘flat base’ cartridges. Note the 3 ‘line shot’ misses above his head that would have created havoc for the first rank infantry. These rifles will shoot just as deadly and true today as 145 years ago.